Librebooting a ThinkPad T400
This post will describe how you can replace the proprietary Lenovo firmware on a ThinkPad T400 laptop with libreboot.
Libreboot versions from November 2022 onwards ship binary blobs to support more boards. GNU boot is a libre alternative.
None of what I am writing here is new - much rather it is a structured guide which integrates different sources on the world wide web, most notably,
- the official Libreboot documentation on installation on the T400,
- this Reddit post on how to install libreboot on a ThinkPad X200 with a RaspberryPi,
- this personal account of installing libreboot on a ThinkPad W500, and
- part 1 and part 2 of another personal librebooting account
with my own experiences.
If you find that this project is too much hassle but would still like to own a laptop with the proprietary BIOS replaced and an FSF-endorsed free GNU+Linux distribution installed, you can buy one here from the lead developer of libreboot. If you’re up to the challenge, however, keep on reading.
1. Preparation
There are some steps you’ll need to take to get some information about your T400 which will come in handy during the installation itself but also for deciding on which tools you need for the installation process to begin with.
1.1 Update the Embedded Controller (EC) firmware
Libreboot replaces the BIOS, not the Embedded Controller firmware. Since you can’t update the EC firmware while running libreboot, you’ll want to do that beforehand.
So, first check which are the latest BIOS and EC versions for your T400 on this Lenovo support page. As of writing, the latest versions for BIOS ID 7Uxxxxxx-based computers are BIOS 3.24 and EC 1.06, while for BIOS ID 7Vxxxxxx-based computers it is BIOS 3.25 and EC 1.06.
To check which versions are currently installed on your T400, shut down the laptop, boot it up again but press the blue ThinkVantage button to interrupt the normal startup and then F1 to enter the BIOS. On the resulting screen you should see the BIOS version and the Embedded Controller Version:

If you realize that your T400 has the latest BIOS and EC versions installed, jump to the next preparation step. Otherwise:
If Windows is currently still installed on the laptop, use the Lenovo System Update utility to update the BIOS and EC firmware.
In case the laptop is already running Linux, you might find useful info on how to upgrade the EC version here. Since I don’t have experience for that case, my guide will be of no help to you in this particular matter.
Once you’re done updating the EC firmware, double check in the BIOS again whether all worked as expected.
1.2 Noting the device’s MAC address
While you’re on the BIOS overview screen, also write down the laptop’s MAC adress.
1.3 Getting the size of the flash chip
Change the BIOS settings to startup from a USB device under Startup -> Boot such that a USB HDD drive is the first disk the BIOS tries to
boot from:
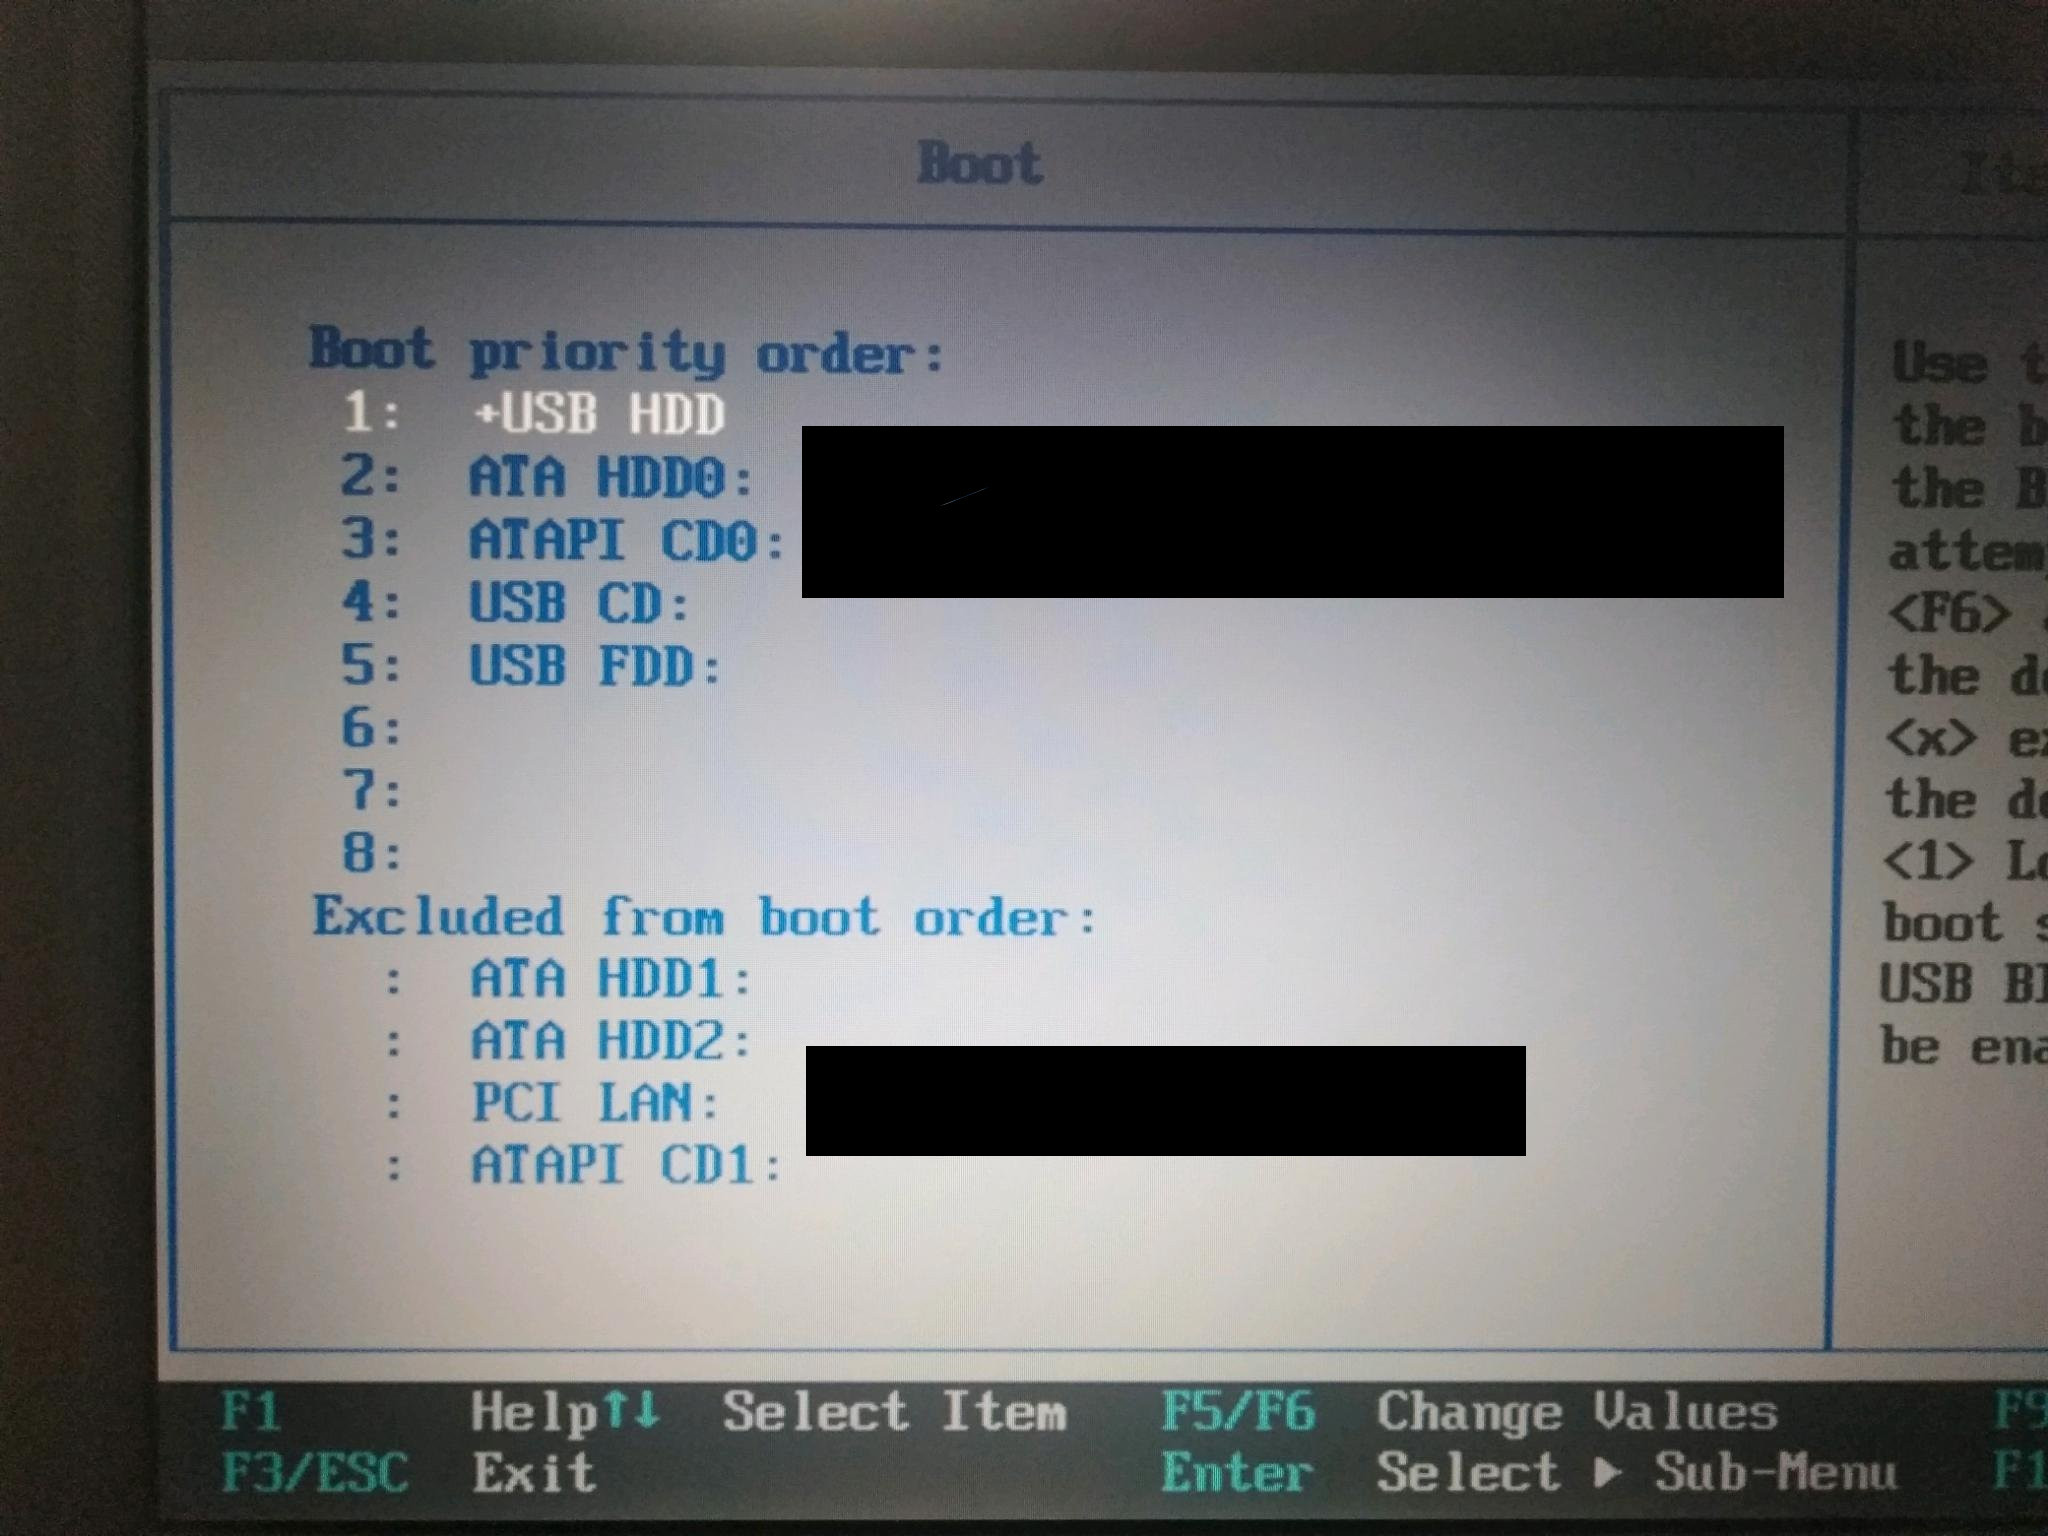
Then insert a bootable USB device with a live Linux distribution of your liking. Boot it, open the Terminal and run
$ sudo dmidecode | grep "ROM Size"If the command returns a ROM Size of 8192 kB, you need the 16 pin SOIC clip. If the chip has a size of only 4096 kB, get the 8 pin clip.
2. Disassembly & Flashing
Libreboot runs on a chip which is hidden on the very bottom of the T400 (on the backside of the motherboard to be precise). Since we need physical access to the chip for flashing it, we’ll have to completely disassemble the T400 (unless you’re really lazy).
2.1 Prerequisites
Before we start disassembling the laptop, please ensure you that have all the required tools for the flashing process:
- any RPR GPIO capable flashing device e.g. RaspberryPi, A64-OlinuXino or BeagleBoneBlack1
- female-to-female jumper cables (optimally of approx. 10cm length)
- 8 or 16 (as determined earlier) pin SOIC clip2
- CPU thermal paste (e.g. Arctic MX-4), isopropyl alcohol, and an anti-static cloth
- screwdriver
Since you’ll be opening up the laptop completely, it is also the time to consider some hardware upgrades:
- WiFi chip: The built-in Intel WiFi chip will not run with non-free
drivers. Therefore, I strongly recommend to replace it with an
Atheros chip which is supported by the free
ath9kdriver, e.g. Atheros AR5B95. - RAM: The currently installed memory cards in the T400 might be incompatible with Libreboot or just too little for your taste. If you decide to buy RAM, make sure the new chips comply with Libreboot’s requirements. I’ll be using 2x4GB 2xR8 RAM chips3 to get the most out of the T400.
- SSD: An SSD will significantly improve the speed of your T400 when compared to a HDD. The laptop will also run more quietly.
2.2 Prepare the flashing device
SSH into your flashing device so that you do not have to attach it to a separate screen and keyboard.
2.2.1 Enable the SPI
On a Raspberry Pi, the Serial Peripheral Interface is disabled by
default. To enable it, open /boot/config.txt in your favorite
editor, uncomment dtparam=spi=on, and reboot the device. Check if
you successfully enabled the SPI by running
$ ls -l /dev/spidev*You should see something along the lines of
crw-rw---- 1 root spi 153, 0 Jan 26 20:08 /dev/spidev0.0
crw-rw---- 1 root spi 153, 1 Jan 26 20:08 /dev/spidev0.1
2.2.2 Install flashrom
Install flashrom by running
$ sudo apt-get update && sudo apt-get install flashrom2.2.3 Get the libreboot files
Now, download the libreboot source4, the relevant roms for the T400 (make sure to specify your flash chip size), and the latest public key of the signing key pair:
# libreboot source & signature file:
$ wget https://rsync.libreboot.org/testing/20210522/libreboot-20210522_src.tar.xz
$ wget https://rsync.libreboot.org/testing/20210522/libreboot-20210522_src.tar.xz.sig
# libreboot T400 roms and signature file:
$ wget https://rsync.libreboot.org/testing/20210522/roms/libreboot-20210522_t400_<4/8>mb.tar.xz
$ wget https://rsync.libreboot.org/testing/20210522/roms/libreboot-20210522_t400_<4/8>mb.tar.xz.sig
# public key of signing key pair:
$ wget https://libreboot.org/lbkey.asc
Then run
# import the public key of the signing key pair:
$ gpg --import lbkey.asc
# verify that the signature files match the archives:
$ gpg --verify libreboot-20210522_src.tar.xz.sig
$ gpg --verify libreboot-20210522_t400_<4/8>mb.tar.xz.sig
You should see gpg: Good signature from "Leah Rowe <info@minifree.org>" [unknown] for both gpg --verify commands.
Now extract the different roms for your laptop model with
$ tar xvf libreboot-20210522_t400_<4/8>mb.tar.xzCopy the .rom which you are planning to use to the parent directory
as libreboot.rom with
$ cp libreboot-20210522_t400_<4/8>mb/grub_t400_<4/8>mb_libgfxinit_corebootfb_<YOUR_KEYBOARD_LAYOUT>.rom libreboot.romFinally, extract the libreboot source with
$ tar xvf libreboot-20210522_src.tar.xzThis can take a while. Once the archive in unpacked, navigate to the
ich9utils directory in the extracted libreboot source and run make
there. This will generate the binaries with which you can later adapt
the MAC address in libreboot.rom.
2.3 Laptop disassembly
Now we’ll start with the actual disassembly process:
- Shut down the T400.
- Remove the battery from the T400 and unplug the laptop.
- Disassemmble the laptop as described here until you have access to the ROM chip. Do yourself the favor and keep the screws in order and close to the elements where they are supposed to go.
2.4 Flashing libreboot
2.4.1 Connect to the BIOS chip
As a precaution, disconnect your flashing device from power.
Now, you’ll have to wire the GPIO pins of your flashing device to the respective pins on your SOIC clip with the jumper cables. Therefore, you need to understand the GPIO pin layout of your flashing device and the pin numbering on the BIOS chip. Pay close attention to wiring the chip up correctly as mistakes here will make establishing a connection with the chip impossible later on or might even damage your device.
Since I used a RaspberryPi 3 and have an 8MB ROM chip, my wiring layout was the following:
| SPI Pin Name | Pin # ROM chip | Pin # RaspberryPi5 |
|---|---|---|
| 3.3V | 2 | 1 |
| CS# | 7 | 24 |
| MISO | 8 | 21 |
| GND | 10 | 25 |
| MOSI | 15 | 19 |
| CLK | 16 | 23 |
If your chip size/flashing device combination is different, please refer to the libreboot docs on the wiring instructions.
Once you’ve wired everything up, connect the flashing device to power
and check whether the chip is found by flashrom:
$ flashrom -p linux_spi:dev=/dev/spidev0.0,spispeed=32768
flashrom v1.1-rc1-48-g2d7ab69 on Linux 4.19.66-v7+ (armv7l)
flashrom is free software, get the source code at https://flashrom.org

Using clock_gettime for delay loops (clk_id: 1, resolution: 1ns).
Found Winbond flash chip "W25X64" (8192 kB, SPI) on linux_spi.
No operations were specified.
Make sure you see a line that says Found ... flash chip "YOUR_CHIP_NAME".... If the chip cannot be found, doublecheck your
wiring and see whether the clip sits properly.
A quick note on the spispeed parameter: On a RaspberryPi you should
be fine with spispeed=32768 in all calls to flashrom. This will
speed up all chip reading/writing operations considerably. For less
reliable devices like the BeagleBoneBlack, however, you will want to
stick with spispeed=512 or spispeed=256.
2.4.2 Backup current BIOS
Read the current BIOS from the chip 3 times and save it in 3 separate
.rom files:
$ sudo flashrom -c "YOUR_CHIP_NAME" -p linux_spi:dev=/dev/spidev0.0,spispeed=32768 -r bios_<1/2/3>.romOnce you have 3 copies of the BIOS, double check whether they are identical (thereby making sure that the connection is stable):
$ sha1sum bios*.romThe resulting checksums should all match.
In the best case you will not need these .rom images anymore, but in
case something goes awry in the next steps, you’ll be able to restore
the Lenovo BIOS with them.
2.4.3 Set the MAC address
If you want to use the Ethernet box of your laptop after installing
libreboot, you’ll have to set the MAC address to what it has been
previously. If you’re fine with using WiFi (see the note on WiFi chip
compatibilities), you can skip this section. For more information on
this topic, consult the official libreboot
documentation on
the ich9utils.
Go to the ich9utils directory of the libreboot source. Check whether
the bios_1.rom you exported from the BIOS chip contains the same MAC
address which you wrote down earlier with:
$ ./ich9show path/to/bios_1.rom | grep MACIn a second step, run
$ ./ich9gen --macaddress <YOUR_MAC_ADDRESS>This will generate files which contain the descriptor+GbE region for
the libreboot.rom. Copy the ich9fdgbe_<YOUR_CHIP_SIZE>m.bin file
to the directory which contains the libreboot.rom. In that directory
then, run
$ dd if=ich9fdgbe_<YOUR_CHIP_SIZE>m.bin of=libreboot.rom bs=12k count=1 conv=notrunc
1+0 records in
1+0 records out
12288 bytes (12 kB, 12 KiB) copied, 0.000812598 s, 15.1 MB/s
You can double check if everything worked fine with running
$ ./ich9show path/to/libreboot.rom | grep MACin the ich9utils directory. You should see the MAC address of your
device as you’ve specified it.
2.4.4 Flash it!
Finally, run
$ sudo flashrom -p linux_spi:dev=/dev/spidev0.0,spispeed=32768 -w libreboot.rom
flashrom v1.1-rc1-48-g2d7ab69 on Linux 4.19.66-v7+ (armv7l)
flashrom is free software, get the source code at https://flashrom.org

Using clock_gettime for delay loops (clk_id: 1, resolution: 1ns).
Found Winbond flash chip "W25X64" (8192 kB, SPI) on linux_spi.
Reading old flash chip contents... done.
Erasing and writing flash chip... Erase/write done.
Verifying flash... VERIFIED.
in the directory containing libreboot.rom to install libreboot on
the BIOS chip. Make sure you see the Verifying flash... VERIFIED.
message. If not, try again.
2.5 Reassemble and test the installation
Power off and disconnect your flashing device from power, then disconnect the SOIC clip from the chip.
Assemble the laptop back to such an extent that you can boot it up and see what the bootup screen looks like. When reapplying the heat sink, completely remove the old thermal paste (on both chips) using the isopropyl alcohol and replace it with fresh one. Also, replace the WiFi chip (if you have one compatible with free drivers); otherwise remove the old Intel one - it is not gonna work without binary blobs anyways.
If you power on your device and don’t see the Lenovo BIOS option anymore, you’re good! Properly reassemble your T400 now.
3. Congratulations!
You made it! You’ve replaced the proprietary Lenovo BIOS on your ThinkPad T400 with libreboot!
Now feel free to install a GNU+Linux distribution of your liking. To keep the laptop 100% Free Software easily, you might want to consider one of the free GNU+Linux distributions as defined by the FSF.
-
I recommend the Pomona SOIC clips. They are slightly more expensive than the ones one can find on Ebay but of good quality. You don’t want to experience issues with broken contacts when flashing or having to mess around with fitting the jumper cables on too thinly aranged pins. ↩︎
-
In my case, the Crucial CT51264BF160B 4GB DDR3L-1600 SODIMM 1.35V. ↩︎
-
Please note that this is a testing release of libreboot. According to the official documentation, the T400 board should be well tested though; so I figured I might go ahead with the most recent libreboot release. Once libreboot is installed, you can also update it without disassembling the laptop again. ↩︎