Smartifying a humidifier
I’ve recently got my hands on a humidifier which can be controlled via a
single knob in a range from OFF to MAX. This is a bit suboptimal from a
control perspective if you want to keep the relative humidity within a
certain band – for example, between 35% and 50% in your living room in
winter – without constant manual intervention.
Fortunately, it is fairly straightforward to turn a “dumb” humidifier like that into a “smart” one which adjusts to its environment without using a full scale home automation system.
Requirements
All you need is:
- A smart plug which can be turned on/off via an HTTP(S) API (in my case a Shelly Plug S).
- A Raspberry Pi with GPIO pins and WiFi connectivity. I’ve used a Pico 2 WH as it is readily available, cheap, and resource efficient. This option will not give you the comforts of a full fledged OS and require you to do a bit of programming with MicroPython. If you want the comfort of an OS, other Raspberry Pis would work, too, of course. The Zero 2 WH would be your best bet but thanks to the LLM craze it is not available anywhere at the moment due to chip shortages1.
- A USB-to-microUSB cable (to connect the Pico to a computer) and a charger to supply power to the Pico when in operation.
- A humidity sensor. I’ve used the SHT31 temperature and humidity sensor from DFRobot.
- A way to connect the sensor to the Raspberry Pi. In my case, that were two two-holed screw clamps and four male-to-female jumper cables.
- A computer to program the Raspberry Pi.
The remainder of the post is very specific to the chosen Pico 2 WH microcontroller, SHT31 sensor, and Shelly Plug. If you’ve used a different single board board computer or microcontroller and/or a different sensor and/or smart plug, the wiring and control commands will likely be somewhat different.
Setup the Shelly Smart Plug
Even though it is not widely advertised by Shelly, you don’t need their proprietary and data hungry app to setup your plugs: You can configure them from a browser by first using the plugs’ WiFi Access Point, and once they have a local IP on your network by pointing your browser to that IP. Follow this guide for a successful app-free setup.
After you’re through with the guide, I would also suggest that you disable
all the features you don’t need (Cloud, MQTT, Bluetooth, etc.) and update
the firmware of the plugs from their web interface. After having done this,
I’ve additionally blocked the plug from accessing updates.shelly.cloud by
blocking DNS resolution for that domain on my Pi-Hole so the plug
doesn’t phone home every 24 hours looking for firmware updates.
Test whether you can interact with the HTTP API of the plug on your local network by making the following HTTP request:
curl -X POST -d '{"id":1,"method":"Sys.GetConfig"}' http://IP_OF_YOUR_SHELLY_PLUG/rpcwhereby IP_OF_YOUR_SHELLY_PLUG is – you guessed it – the IP of your
Shelly plug. This call should return the general configuration of your
Shelly plug.
Setup the Raspberry Pi
With the smart plug set up, we can now proceed with the Raspberry Pi.
Get MicroPython onto the Pico
To install MicroPython onto the Pico, download the appropriate .ef file
for your Pico model from this official page and copy it
to your Pico as described there.
Make the Pico LED blink once
Install Thonny on your computer and connect the Pico to it with the USB-to-MicroUSB cable.
Select the MicroPython (Raspberry Pi Pico) interpreter from Options > Interpreter in Thonny.
Execute the following on the Pico either line by line in the Python Shell in Thonny or as a whole script:
import machine
import time

led = machine.Pin("LED", machine.Pin.OUT)
led.value(1)
time.sleep(0.5)
led.value(0)
You should see the builtin LED of the Pico blink once for 0.5 seconds (if
run as a script; if you issue the commands via the shell, you have more
impact on how long the LED is on than the time.sleep() call).
Control the Shelly plug from the Pico
To send commands to the Shelly plug from the Pico, you first need to connect the Pico to your WiFi network. You can use the code snippet from the MicroPython docs on the Raspberry Pi RP2xxx boards to accomplish this:
import network

wlan = network.WLAN()       # create station interface (the default, see below for an access point interface)
wlan.active(True)           # activate the interface
wlan.scan()                 # scan for access points
wlan.isconnected()          # check if the station is connected to an AP
wlan.connect('ssid', 'key') # connect to an AP
wlan.config('mac')          # get the interface's MAC address
wlan.ipconfig('addr4')      # get the interface's IPv4 addresses
Once your Pico is connected to your local network, you can make HTTP
requests using the MicroPython requests implementation.
To mimic the curl request from earlier, in which you queried the general
configuration of your Shelly plug, you could run the following code
(assuming that your Pico is connected to your local network already):
import requests

IP_OF_YOUR_SHELLY_PLUG = "xxx.xxx.xxx.xxx"
url = "http://" + IP_OF_YOUR_SHELLY_PLUG + "/rpc"
resp = requests.post(url + "/Sys.GetConfig")
print(resp.json())
To be able to abstract away the details of a few very basic calls to the
Shelly plug HTTP API, I wrote the microshelly “library”. It
is very far from perfect or complete, but it works for my purposes of
switching a Shelly plug on and off.
Wire up the sensor to the Pico
To enable the Pico to read measurements from the sensor, you need to wire the two together.
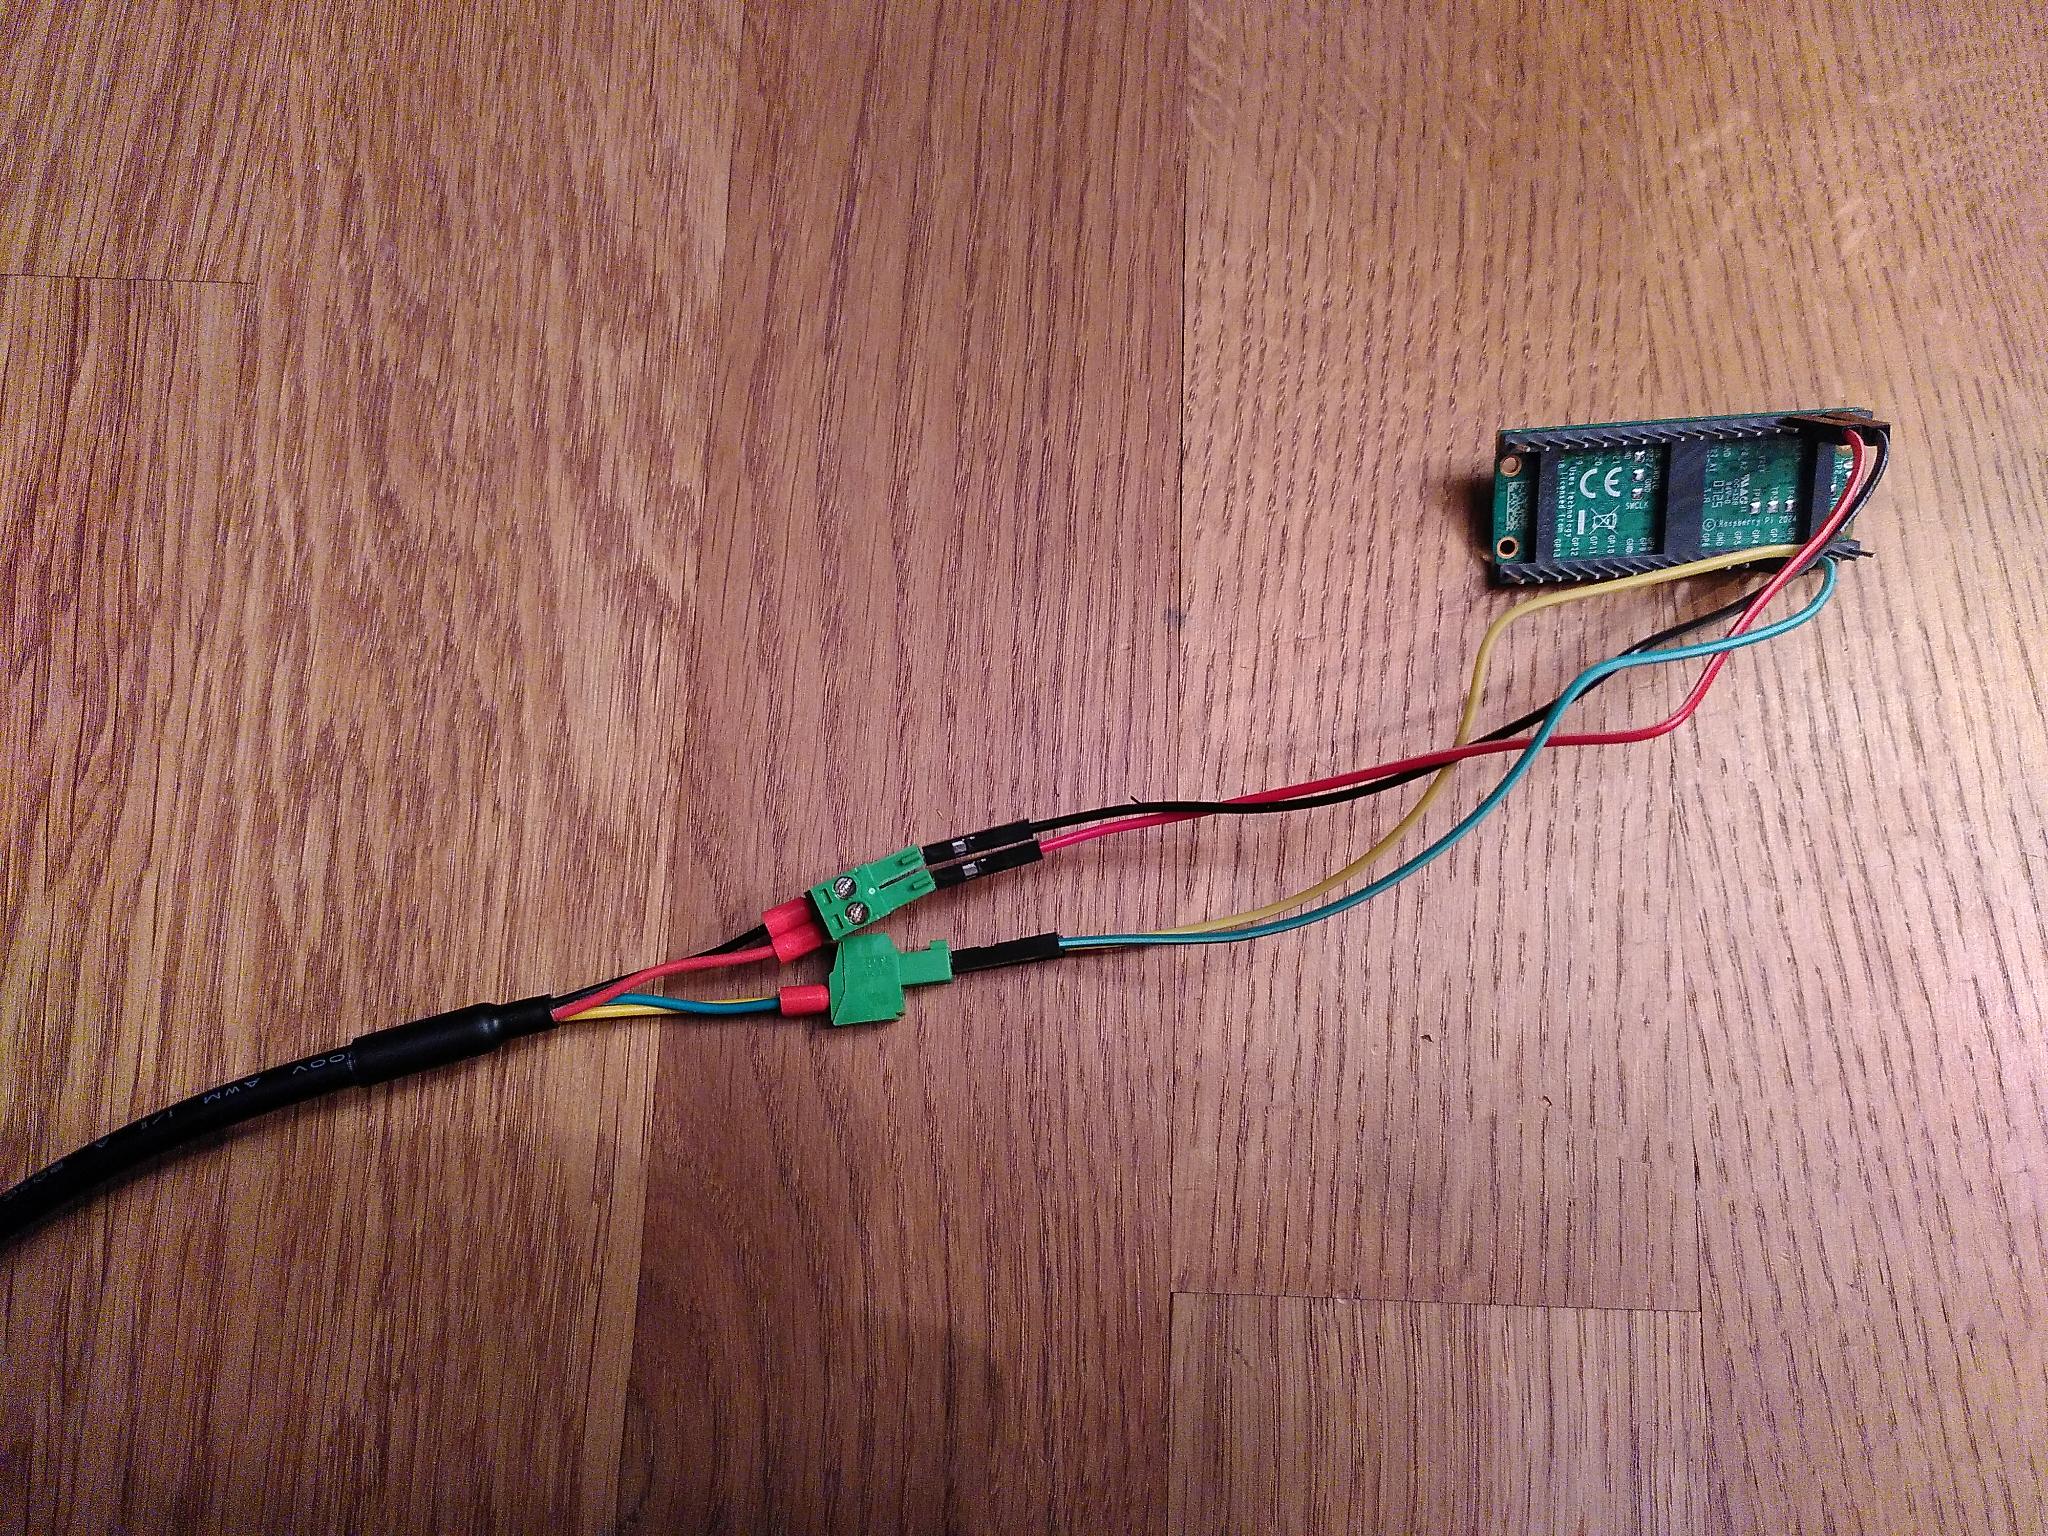
Im my case, with the specific SHT31 model I bought and the Pico 2 WH pinout, the wiring was as follows:
| sensor cable color | sensor wiring | Pico pin # | Pico GPIO pin # |
|---|---|---|---|
| red | VCC (+) | 36 | |
| black | GND (-) | 38 | |
| green | SDA data line | 6 | 4 |
| yellow | SCL clock line | 7 | 5 |
Please note the difference between the pin number and the GPIO pin number on the Pico. This difference tripped me up on the next step.
My initial naïve hope was that four female-to-female jumper cabels (for Dupont pins) would do the trick, but the pins of my sensor were too big. Therefore, I had to use two screw clamps (with two inputs and outputs each) and four male-to-female jumper cables to connect my sensor to the Pico. This is what the end result looked like for me:
Read measurements from the sensor
Once you’ve connected the sensor to the Pico, you should try reading measurements from the sensor. For the SHT31 sensor, you can use the micropython-sht31 “driver” for one-time sensor readings.
To use the “driver” without manipulating the sys.path variable, create a
lib directory on the Pico via Thonny, and copy the sht31.py file in
there. With a correctly wired up sensor, running the following on the Pico
via Thonny should give you a one-time measurement of the temperature and
relative humidity printed out to the console:
from machine import Pin, I2C
import sht31
i2c = I2C(id=0, scl=Pin(5), sda=Pin(4), freq=400000)
sensor = sht31.SHT31(i2c, addr=0x44)
temp, humidity = sensor.get_temp_humi()
print(temp, humidity)
Make sure that the id, scl, and sda parameters in the I2C call
correspond to your wiring!
Putting it all together
With all this setup work, we can finally control the humidifier from the
Pico by saving the following script as main.py2 to the Pico:
# MIT License
#
# Copyright (c) 2026 Alex <alex@puer-robustus.eu>
#
# Permission is hereby granted, free of charge, to any person obtaining a copy of this software and
# associated documentation files (the "Software"), to deal in the Software without restriction, including
# without limitation the rights to use, copy, modify, merge, publish, distribute, sublicense, and/or sell
# copies of the Software, and to permit persons to whom the Software is furnished to do so, subject to the
# following conditions:
#
# The above copyright notice and this permission notice shall be included in all copies or substantial
# portions of the Software.
#
# THE SOFTWARE IS PROVIDED "AS IS", WITHOUT WARRANTY OF ANY KIND, EXPRESS OR IMPLIED, INCLUDING BUT NOT
# LIMITED TO THE WARRANTIES OF MERCHANTABILITY, FITNESS FOR A PARTICULAR PURPOSE AND NONINFRINGEMENT. IN NO
# EVENT SHALL THE AUTHORS OR COPYRIGHT HOLDERS BE LIABLE FOR ANY CLAIM, DAMAGES OR OTHER LIABILITY, WHETHER
# IN AN ACTION OF CONTRACT, TORT OR OTHERWISE, ARISING FROM, OUT OF OR IN CONNECTION WITH THE SOFTWARE OR THE
# USE OR OTHER DEALINGS IN THE SOFTWARE.

import gc
import machine
import network
import time

import sht31

from microshelly import ShellyPlug


SSID = "YOUR_WIFI_NETWORK_SSID"
PWD = "YOUR_WIFI_NETWORK_PWD"
SHELLY_PLUG = "IP_OF_YOUR_SHELLY_PLUG"
CHECK_INTERVAL = 5  # in seconds
LOWER = 35
UPPER = 50
DEBUG = False


def do_connect(ssid, pwd, debug=False):
    wlan = network.WLAN()
    wlan.active(True)
    if not wlan.isconnected():
        if debug:
            print('connecting to network...')
        wlan.connect(ssid, pwd)
        while not wlan.isconnected():
            machine.idle()
    if debug:
        print('network config:', wlan.ipconfig('addr4'))


def regulate_humidity(plug, sensor, lower_hum, upper_hum, debug=False):
    _, humidity = sensor.get_temp_humi()
    if debug:
        print("Humidity:", humidity)
    if humidity >= upper_hum:
        if debug:
            print("Turning/keeping plug off")
        plug.turn_off()
    elif humidity <= lower_hum:
        if debug:
            print("Turning/keeping plug on")
        plug.turn_on()


if __name__ == '__main__':
    led = machine.Pin("LED", machine.Pin.OUT)
    for _ in range(3):
        led.value(1)
        time.sleep(0.5)
        led.value(0)
        time.sleep(0.5)
    do_connect(SSID, PWD, debug=DEBUG)
    plug = ShellyPlug(SHELLY_PLUG)
    i2c = machine.I2C(id=0, scl=machine.Pin(5), sda=machine.Pin(4), freq=400000)
    sensor = sht31.SHT31(i2c, addr=0x44)
    while True:
        regulate_humidity(plug, sensor, LOWER, UPPER, debug=DEBUG)
        gc.collect()
        time.sleep(CHECK_INTERVAL)
A few things to note about the above script:
- The first for loop in the
'__main__'section makes the Pico builtin LED blink thrice. It doesn’t have any functional meaning for the humidification problem but helped me catch an issue with a faulty power cable :/ - The
gc.collect()call is important as the Pico will otherwise run of out memory after a few loops. - The script does not elegantly handle the case of the Pico getting disconnected from power or running into an error: If the plug is turned on at that point it time, the humidifier will proceed humidifying until it runs out of water – not great if you don’t want to exceed a relative humidity threshold of 50%. To prevent this scenario, I’ve added an advanced schedule3 on my Shelly plug (via the web interface), which tells it to automatically switch off every two minutes. As long as the read interval from the sensor is (noticably) shorter than that, a normally operating Pico will send the command to turn the plug on again if the humidity is too low.
Congrats, you now have a smart and versatile humidifier!
-
Obligatory “Fuck you!” to the planet destroying, truth undermining, worker hostile, commons exploiting, power centralizing “AI” “industry”. ↩︎
-
main.pyis the script which will be automatically executed by MicroPython when the Pico is powered on. ↩︎ -
The advanced schedules use a somewhat convoluted graphical version of the cron syntax. ↩︎